As we become more aware of the impact of our actions on the environment, many of us are looking for ways to reduce our carbon footprint and live a more sustainable lifestyle. One simple yet effective way to do this is by making our own weather vanes. Not only is it a fun and creative DIY project, but it also helps to reduce waste and promote a greener future. In this article, we will discuss why traditional weather vanes are harmful to the environment, the benefits of making your own, and provide a step-by-step guide on how to make one.
The Environmental Impact of Traditional Weather Vanes
Traditional weather vanes, also known as wind vanes, are typically made from metal or plastic and are used to indicate the direction of the wind. While they may seem harmless, these seemingly innocent objects have a significant impact on the environment.
1. Production and Disposal
The production of metal and plastic weather vanes requires the extraction of natural resources and the use of energy, which contributes to carbon emissions and pollution. Additionally, these materials are not biodegradable and can take hundreds of years to decompose in landfills. This means that once they are discarded, they will continue to harm the environment for a long time.
2. Harmful Chemicals
Plastic weather vanes are often made from PVC, which contains harmful chemicals such as phthalates and dioxins. These chemicals can leach into the soil and water, polluting the environment and posing a threat to wildlife and human health.
3. Wildlife Disturbance
The spinning motion of traditional weather vanes can also be harmful to birds and other wildlife. Birds can become entangled in the moving parts, leading to injury or death. Additionally, the noise and movement of the vanes can disrupt the natural behavior of animals, affecting their ability to hunt, mate, and rest.
The Benefits of Making Your Own Weather Vanes
Making your own weather vanes not only reduces the negative impact on the environment but also has several other benefits.
1. Cost-effective
Making your own weather vane is a cost-effective alternative to purchasing one. Most of the materials needed can be found around the house or purchased at a low cost, making it an affordable DIY project.
2. Customizable
When making your own weather vane, you have the freedom to choose the design and materials that best suit your style and needs. This allows for a more personalized and unique weather vane that reflects your creativity and personality.
3. Educational
Making a weather vane can be a fun and educational activity for children and adults alike. It provides an opportunity to learn about weather patterns, wind direction, and the importance of sustainability.
4. Promotes Recycling and Upcycling
By using materials that would otherwise end up in the landfill, making your own weather vane promotes recycling and upcycling. This not only reduces waste but also gives new life to old items.
How to Make Your Own Weather Vane
Now that we've discussed the benefits of making your own weather vane, let's dive into the steps on how to make one.
Materials Needed:
- A piece of wood or cardboard
- A pencil
- A ruler
- A compass
- Scissors
- Paint or markers
- A small nail or thumbtack
- A straw or wooden dowel
- A small piece of metal or plastic (optional)
Directions:
-
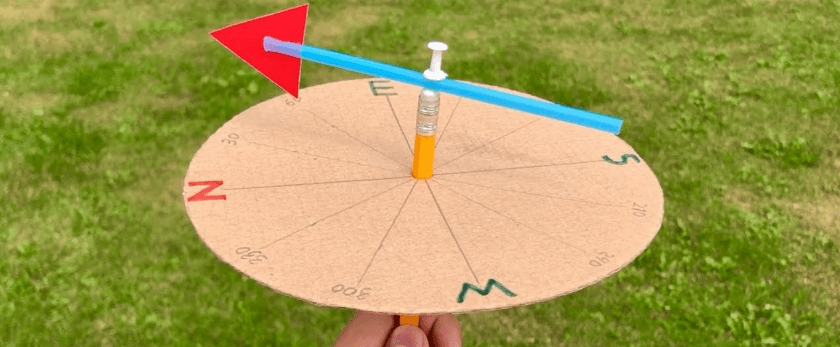
Begin by drawing a large arrow shape on the piece of wood or cardboard. This will be the main part of your weather vane.
-
Use a ruler to divide the arrow into four equal sections. Label each section with the four cardinal directions: North, South, East, and West.
-
Use a compass to draw a circle in the center of the arrow. This will be the pivot point for your weather vane.
-
Cut out the arrow shape and the circle using scissors.
-
Paint or decorate the arrow as desired. You can also use markers to add details and designs.
-
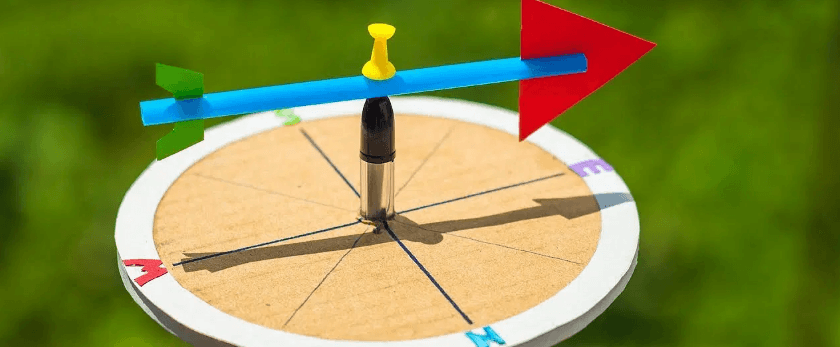
Once the paint is dry, use a small nail or thumbtack to attach the arrow to the pivot point in the center of the circle.
-
Cut a small piece of straw or wooden dowel and attach it to the back of the arrow using glue or tape. This will act as the pointer for your weather vane.
-
If you have a small piece of metal or plastic, you can attach it to the bottom of the straw or dowel to help balance the weather vane and make it more stable.
-
Find a suitable location to place your weather vane, such as a garden or rooftop. Make sure it is in an open area where it can catch the wind.
-
Use a small nail or stake to secure the weather vane in place.
Congratulations, you have successfully made your own weather vane!
Responsible Disposal of Traditional Weather Vanes
If you already have a traditional weather vane, it's important to dispose of it responsibly. Here are some options for proper disposal:
- Recycle: If your weather vane is made from metal, it can be recycled at a local recycling center. Make sure to remove any plastic or other non-recyclable materials before recycling.
- Upcycle: Get creative and repurpose your weather vane into something new. You can use it as a garden decoration or turn it into a piece of art.
- Donate: If your weather vane is still in good condition, consider donating it to a thrift store or giving it to someone who can use it.
Conclusion
In conclusion, making your own weather vane is a simple and effective way to reduce waste and promote a greener future. By using materials that would otherwise end up in the landfill, you can create a unique and personalized weather vane while also educating yourself and others about the importance of sustainability. So why not give it a try and make your own weather vane today? Your planet will thank you.