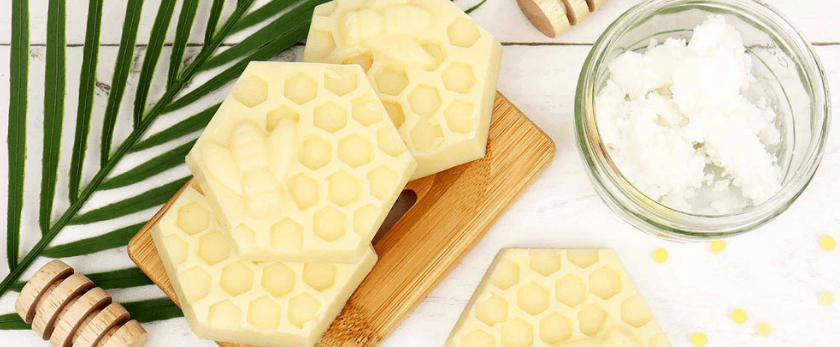
Welcome to the world of homemade lotion bars! These little bars of moisturizing goodness are not only great for your skin, but they are also a much more eco-friendly alternative to store-bought lotions. In this article, we will discuss why traditional lotions are bad for the environment, why making your own lotion bars is better, what you will need to make them, and step-by-step directions for creating your own lotion bars.
Why Traditional Lotions are Bad for the Environment
Traditional lotions, while they may leave your skin feeling soft and smooth, often come with a heavy environmental cost. Here are some of the reasons why:
- Plastic packaging: Most lotions come in plastic bottles, which contribute to the growing problem of plastic pollution. These bottles often end up in landfills or in our oceans, where they can take hundreds of years to decompose.
- Chemicals: Many lotions contain harmful chemicals such as parabens, phthalates, and synthetic fragrances. These chemicals not only harm our bodies, but they also end up in our waterways and can have a negative impact on aquatic life.
- Transportation: Traditional lotions are often mass-produced and shipped long distances, which contributes to carbon emissions and air pollution.
Why Making Your Own Lotion Bars is Better for the Environment
Making your own lotion bars is a simple and effective way to reduce your environmental impact. Here's why:
- No plastic packaging: By making your own lotion bars, you can choose to use reusable or recyclable containers, reducing the amount of plastic waste you produce.
- Natural ingredients: When you make your own lotion bars, you have control over the ingredients you use. You can opt for natural, organic, and sustainably sourced ingredients, avoiding harmful chemicals and reducing your impact on the environment.
- Local sourcing: Making your own lotion bars allows you to support local businesses and reduce the carbon footprint associated with transportation.
- Less waste: By making your own lotion bars, you can make only what you need, reducing the amount of product that goes to waste.
What You Will Need
To make your own lotion bars, you will need the following ingredients and materials:
- Beeswax: Beeswax is the base of the lotion bar and helps to solidify the mixture. Look for locally sourced beeswax to support beekeepers in your area.
- Carrier oil: Carrier oils, such as coconut oil, almond oil, or jojoba oil, provide moisture and nourishment to the skin.
- Essential oils: Essential oils not only add a pleasant scent to your lotion bars, but they also have therapeutic benefits for the skin.
- Double boiler or microwave-safe bowl: You will need a way to melt the beeswax and carrier oil together. A double boiler is the preferred method, but you can also use a microwave-safe bowl.
- Silicone molds or reusable containers: These will be used to shape and store your lotion bars.
- Optional: Vitamin E oil, shea butter, cocoa butter, or other nourishing ingredients can be added for extra benefits.
Directions for Making Your Own Lotion Bars
Now that you have all the necessary ingredients and materials, it's time to make your own lotion bars! Follow these simple steps:
-
Prepare your work area: Lay out all your ingredients and materials on a clean and flat surface. Make sure your molds or containers are clean and dry.
-
Melt the beeswax and carrier oil: In a double boiler or microwave-safe bowl, melt 1 part beeswax to 3 parts carrier oil. Stir occasionally until fully melted.
-
Add optional ingredients: If you are using any additional ingredients, such as shea butter or vitamin E oil, add them to the mixture and stir until fully incorporated.
-
Add essential oils: Once the mixture has cooled slightly, add a few drops of your chosen essential oils and stir well. Be careful not to add too much, as essential oils are highly concentrated.
-
Pour into molds or containers: Carefully pour the mixture into your silicone molds or reusable containers. If using molds, make sure to leave some space at the top for the lotion bars to expand as they cool.
-
Let them cool: Allow the lotion bars to cool and solidify for at least an hour. If using molds, you can place them in the fridge to speed up the process.
-
Pop out of molds or remove from containers: Once the lotion bars are fully solidified, pop them out of the molds or remove them from the containers.
-
Store and use: Store your lotion bars in a cool, dry place. To use, simply rub the bar between your hands to warm it up and then apply to your skin. The heat from your hands will melt the lotion bar, making it easy to spread onto your skin.
Responsible Disposal Methods
Once you have used up your lotion bars, it's important to dispose of them responsibly. Here are some options:
- Reuse the container: If you used a reusable container, simply clean it out and reuse it for your next batch of lotion bars or for other purposes.
- Recycle the container: If your container is made of recyclable material, make sure to clean it out and recycle it properly.
- Compost the lotion bar: If your lotion bar is made of all-natural ingredients, you can compost it in your home compost bin or take it to a local composting facility.
- Upcycle the lotion bar: You can also get creative and find ways to upcycle your lotion bar, such as using it as a moisturizer for leather goods or as a wax for sealing envelopes.
Conclusion
By making your own lotion bars, you can not only have soft and nourished skin, but you can also reduce your environmental impact. With simple ingredients and easy-to-follow directions, anyone can make their own lotion bars at home. So why not give it a try and join the movement towards a greener, more eco-friendly lifestyle? Your skin and the planet will thank you.
