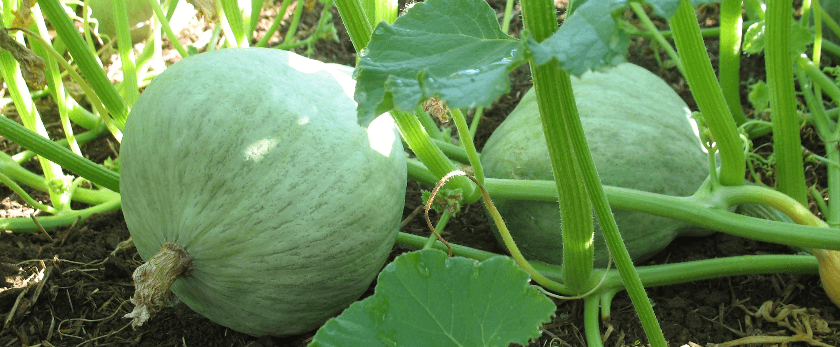
Hubbard squash is a delicious and versatile vegetable that can be grown in your own backyard. Not only is it a tasty addition to your meals, but it also has numerous health benefits and is easy to grow. In this article, we will discuss the steps to successfully grow hubbard squash, including caring for the plant, the best time to grow, and common problems that may arise.
Caring for Hubbard Squash
Watering
Hubbard squash plants require consistent and even watering to thrive. The soil should be kept moist but not waterlogged. It is important to water the plants deeply, at least 1 inch per week, rather than frequent shallow watering. This will encourage the roots to grow deeper and make the plant more resilient to drought.
Light
Hubbard squash plants need full sun to grow and produce fruit. Make sure to choose a spot in your garden that receives at least 6-8 hours of direct sunlight per day. If you are growing the plant in a container, make sure to place it in a sunny location.
Soil
The ideal soil for hubbard squash is well-draining, rich in organic matter, and has a pH level between 6.0-6.8. If your soil is not suitable, you can amend it by adding compost or aged manure before planting. This will provide the necessary nutrients for the plant to grow.
Fertilizer
Hubbard squash plants are heavy feeders and require regular fertilization. You can use a balanced fertilizer, such as a 10-10-10, every 2-3 weeks during the growing season. Alternatively, you can use organic fertilizers, such as fish emulsion or compost tea, to provide the necessary nutrients for the plant.
Pruning
Pruning is not necessary for hubbard squash plants, but it can help improve air circulation and prevent diseases. You can remove any dead or damaged leaves and vines to keep the plant healthy. Additionally, pruning can help control the size of the plant and prevent it from taking over your garden.
Best Time to Grow Hubbard Squash
Hubbard squash is a warm-season vegetable and should be planted after the last frost in your area. The ideal temperature for growing hubbard squash is between 70-85°F. If you live in a cooler climate, you can start the seeds indoors 3-4 weeks before the last frost and transplant them outside once the weather warms up.
Common Problems with Hubbard Squash
Pests
Hubbard squash plants are susceptible to various pests, including squash bugs, cucumber beetles, and squash vine borers. These pests can cause damage to the leaves and stems of the plant, leading to reduced growth and fruit production. To prevent pest infestations, you can use row covers, handpick the pests, or use organic insecticides.
Diseases
Hubbard squash plants can also be affected by diseases such as powdery mildew, bacterial wilt, and mosaic virus. These diseases can cause wilting, yellowing of leaves, and stunted growth. To prevent diseases, make sure to plant disease-resistant varieties, rotate your crops, and practice good garden hygiene.
Blossom End Rot
Blossom end rot is a common problem with hubbard squash plants, where the bottom of the fruit turns black and rots. This is caused by a calcium deficiency in the soil or irregular watering. To prevent this, make sure to water the plants consistently and add calcium-rich amendments to the soil.
Responsible Disposal Methods
Once you have harvested your hubbard squash, it is important to dispose of the plant and its parts responsibly. You can compost the plant material, including the leaves and vines, to create nutrient-rich compost for your garden. If you do not have a compost bin, you can also dispose of the plant in your green waste bin for municipal composting.
Conclusion
Growing hubbard squash is a rewarding experience that can provide you with delicious and nutritious vegetables. By following the care tips mentioned in this article, you can successfully grow hubbard squash in your own backyard. Remember to also practice responsible disposal methods to contribute to a more sustainable future. Happy gardening!
